GachaPon_tutorial
This project was created as an entry to the 2020 Developer's Circle Community Challenge hosted by Facebook.
Project maintained by The-AR-Company Hosted on GitHub Pages — Theme by mattgraham
How to make a Gacha-pon filter
Introduction
In this tutorial, you will learn how to make a Gachapon type of effect. A Gachapon is a Japanese toy vending machine. You won’t know what you will get until you open the plastic capsule.

This tutorial will include the following techniques:
- Randomizing objects
- Animating an object’s position, size and rotation
- Working with layers and textures
- Face interactions
What you will need to make this project are the following:
- A 3D gachapon machine
- A 3D gachapon knob
- Several 3D toys you’d like to randomize
- A 3D plastic capsule for the toys
- Another 3D capsule but separated into 2 parts
- 3D Head Occluder you can get from Spark AR’s face assets
Part 1 - Getting started
Let’s open a blank project in Spark AR. Go down to the bottom left side of the window and inside the assets panel, click the ‘’From Computer” button under “Import” so we can import the 3D objects that we need.
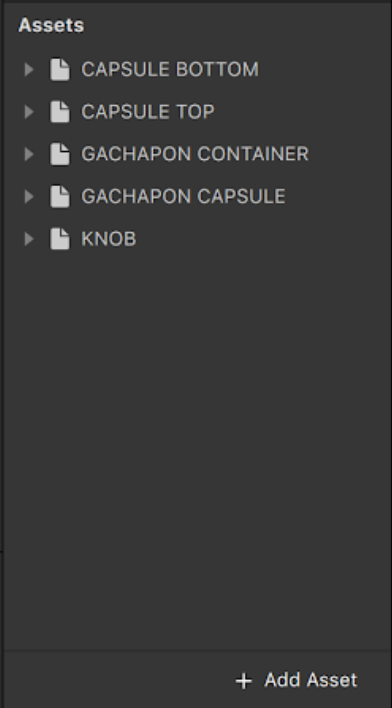
Now we have the following 3D objects:
- The Gachapon container
- The knob
- Two 3D capsules. (One for the top part and another for the bottom part. You can also just import 1 and rotate it but it’s easier to just have both)
- One whole 3d Capsule
For this tutorial, let’s replace the toys with different kinds of 3D objects.
Go to the assets panel and on the bottom side, click “Add Asset” then Search AR Library. A new window will open. Click “3D Objects” and select “3D Shapes”.
Import the following objects:
- Cube
- Sphere
- Icosahedron
- Torus
- Tetrahedron
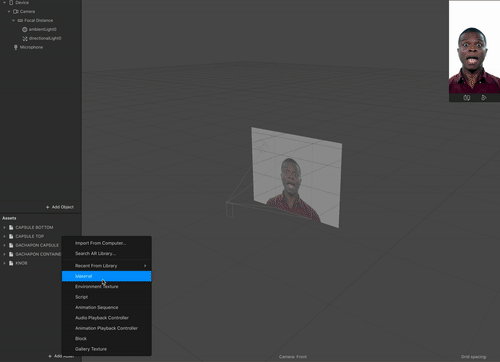
Don’t forget to import the Head Occluder from the Spark AR face assets as well.
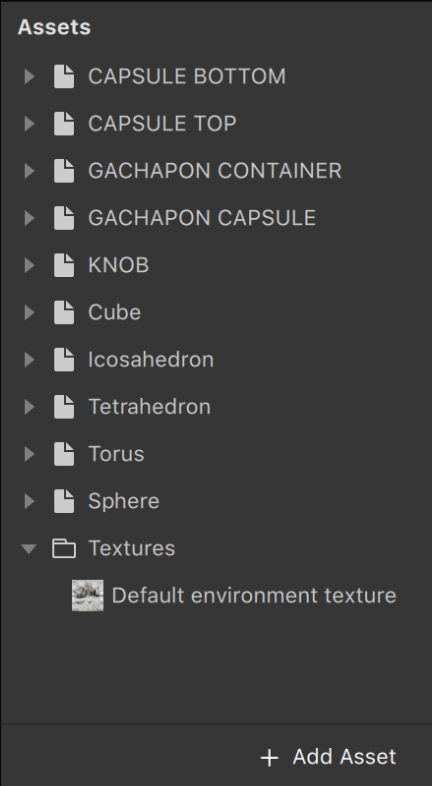
Your assets panel should look like this
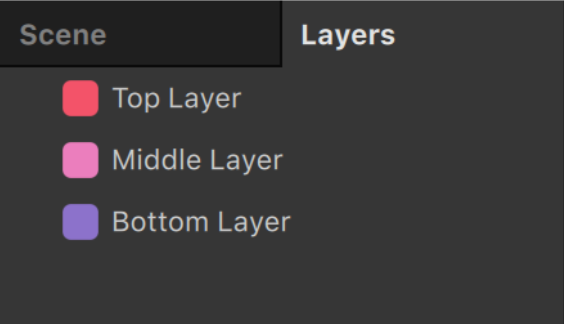
Go to the Layer Panel Beside the scene panel and click “Add Layer” twice. Rename the first layer as “Top layer” the 2nd as “Middle Layer” and the 3rd one as “Bottom Layer”
Go back to the Scene panel and right click on “Focal Distance”, hover over “add” and select “Face Tracker”. Right click on Face tracker and add 2 Face Meshes. Rename the first one at “Retouch” and the other as “Face”. Retouch should be on the top layer and Face should be on the Middle layer.. Uncheck the eyes and mouth as well for both.

Create a new material for both Retouch and Face. Select the Retouch face mesh and in the inspector panel, click the + sign beside “Material” Double click on it and it will open up the Material Panel. Rename the Material to “Retouch” by either going to the top part of the material panel and double clicking on the name or by going to the assets panel, right click on the material and select “Rename”.
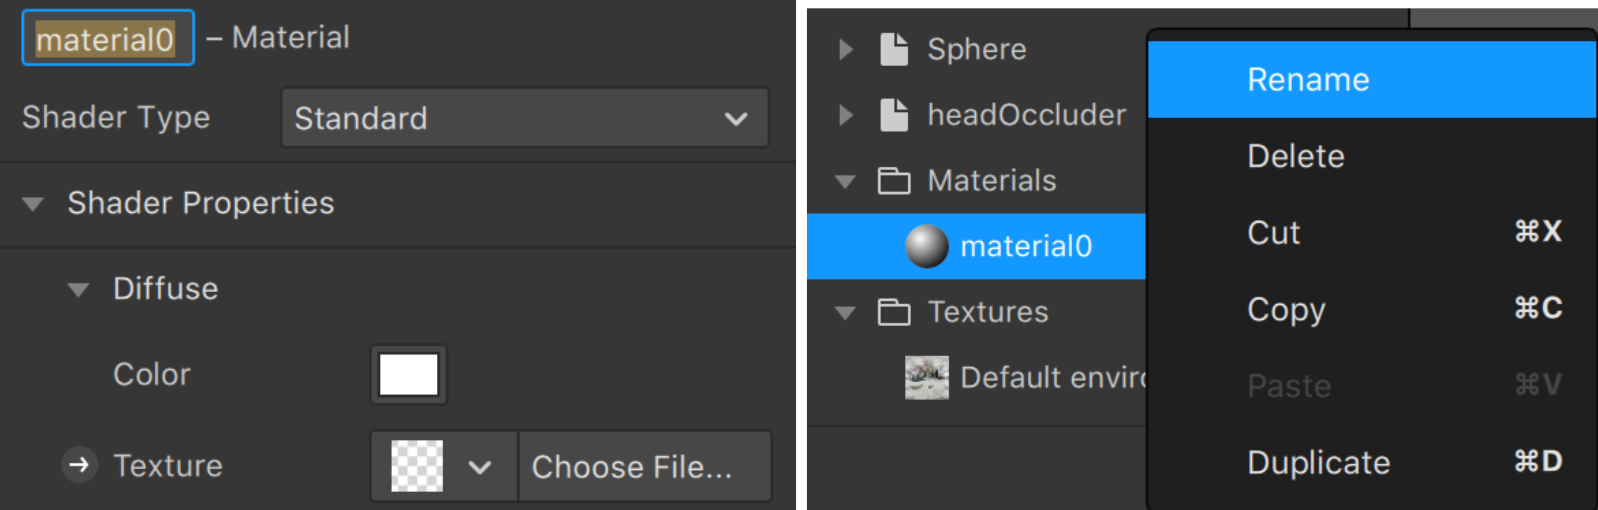
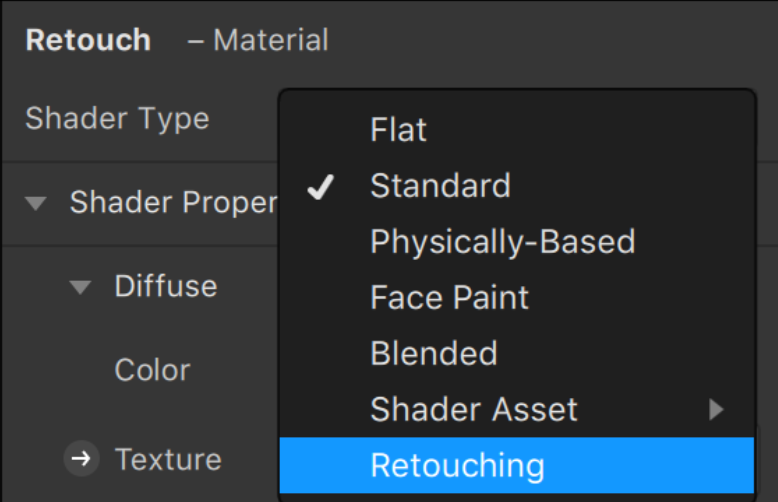
Under Shader Type, Select “Retouching”
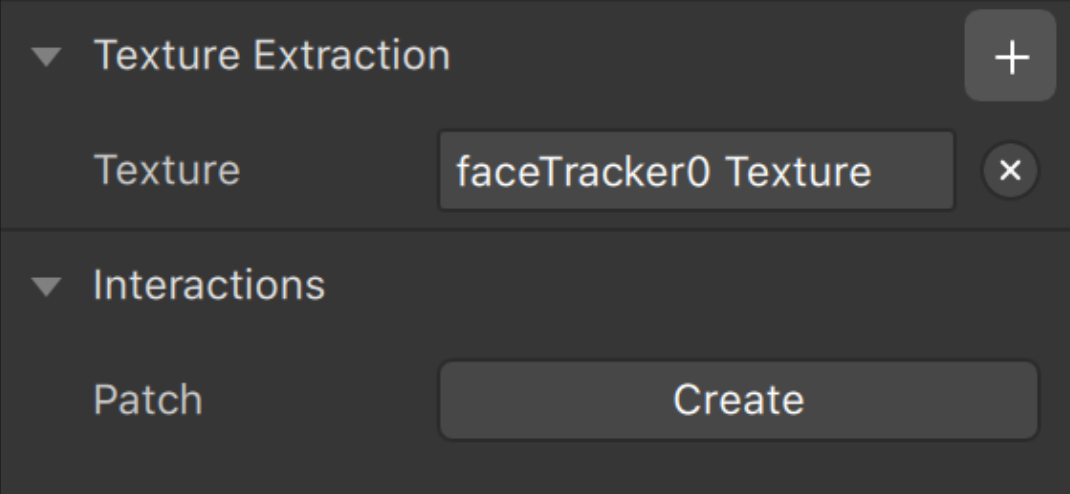
Now, before you do the same process for the “Face” face mesh, Select the Face tracker first and in the inspector panel, click on the + sign beside “Texture Extraction”. This will get us the Face Texture that we will put in our Face Material.
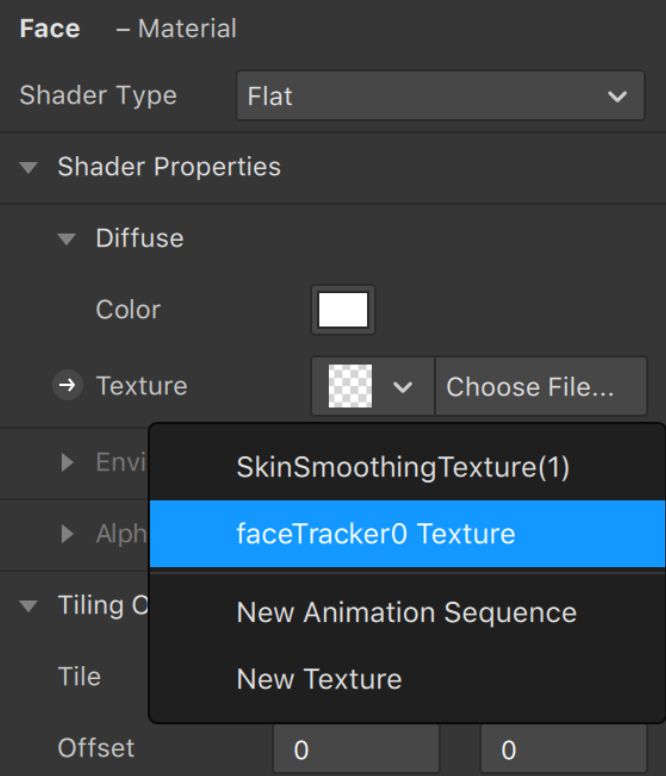
Make a new Material for Face and rename it to just “face” again. Change the Shader type to Flat and under Texture, select the Face tracker Texture.
Part 2 - Creating the Gachapon machine
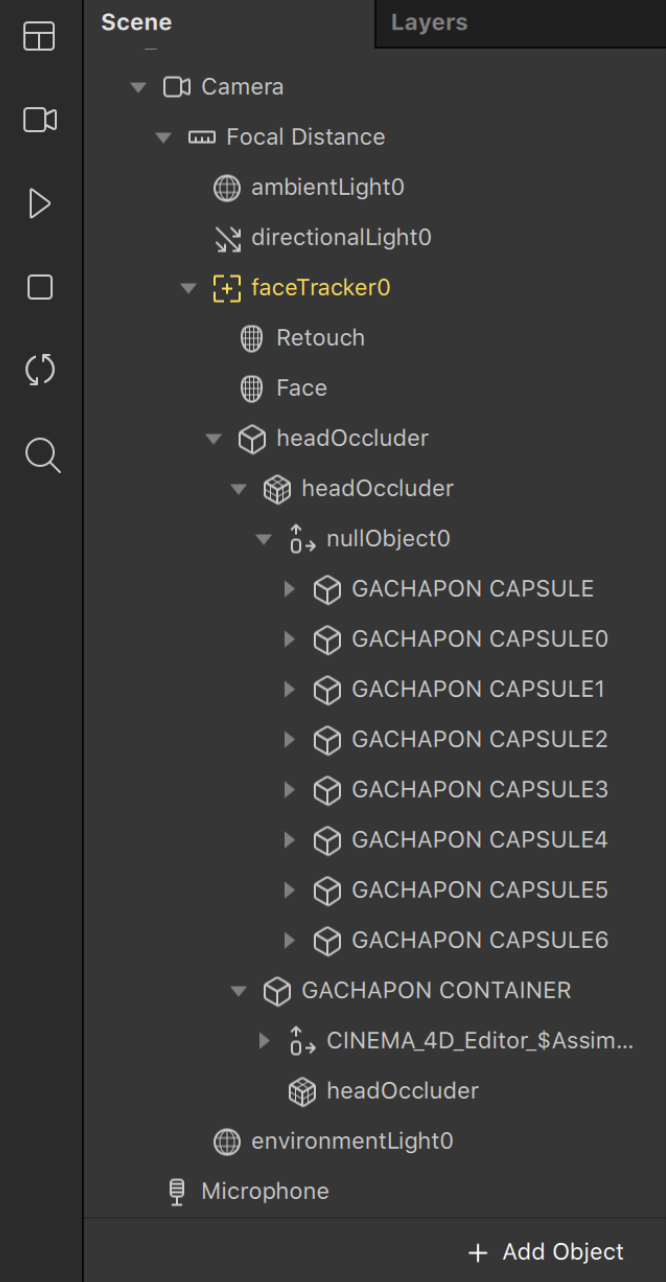
Go to the assets panel and grab the Head occluder and drag it on the face tracker to make it a child of it. Then go back to the assets panel and grab your Gachapon Container and drag it to the Head occluder to make it a child of that. This is how your window should look like.

Resize the Head occluder from 1 to 1.1 on X, Y and Z

Then Resize the Gachapon Container from 1 to 1.2 on X, Y and Z as well. Move the position so it can rest well on the head occluder.
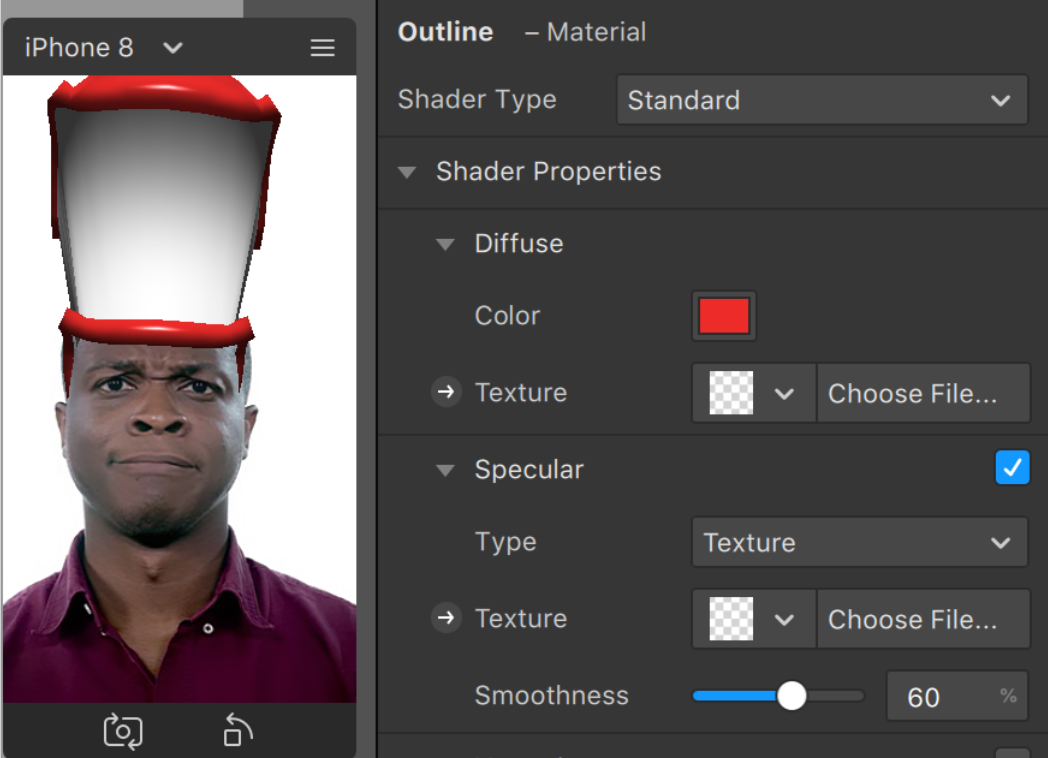
Go to the Material of the Head Occluder and change the blend mode from Replace to Alpha and reduce the opacity from 100 to 1. Now the head occluder is invisible. Go to the Material of the Gachapon Container and depending on how you create yours, there should be 1 or 2 materials for it. 1 for the outline and 1 for the glass part. Select the Material for the outline, rename it to “outline” and choose a color for it. I’m going to use Red for now. Turn on the Specular and change the smoothness to around 60.
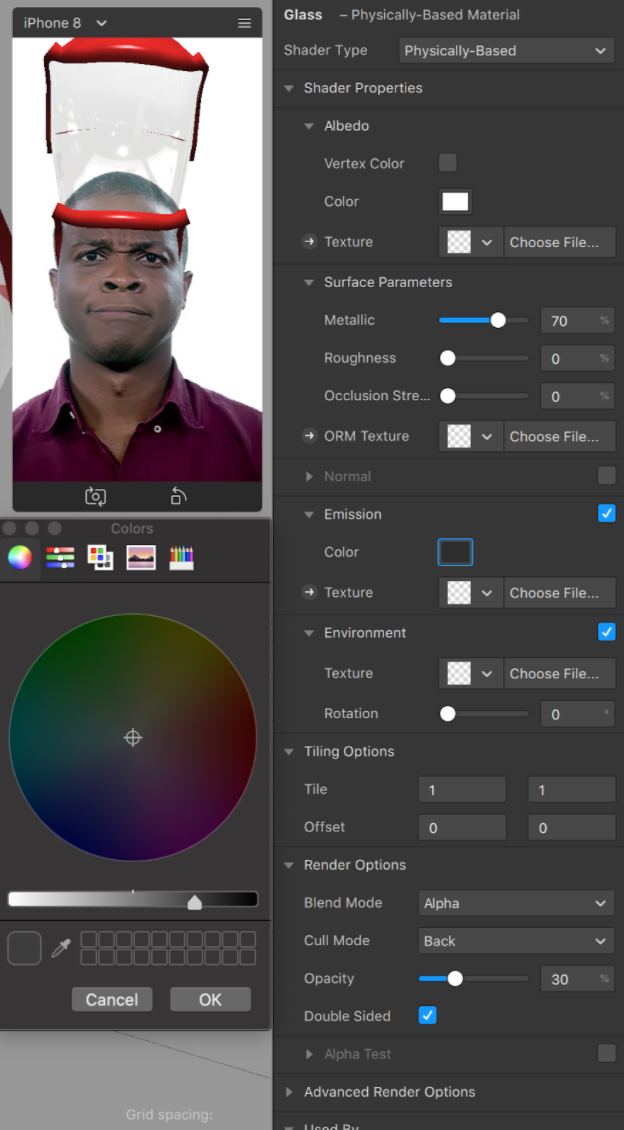
Before we edit the Material for the glass, let’s import an Environment Texture. Go to the assets panel again and click Add Asset/ Environment Texture then choose any of the textures available. For now, let’s import Skylit Garage.
Go to the Scene Panel and add an “Environment Light” (note: it doesn’t need to be a child of the face tracker). Select it and go to the inspector panel and under Texture, select Skylit Garage.

Now, go to the material for the Glass and first change the shader type to “Physically Based” and then you can rename it to Glass. Set the metallic to 70, turn on the Emission and move it just a tad bit away from black, turn on the environment, the blend mode should be alpha, the opacity should only be at 30% and check double-sided
Now, go to the assets panel and drag your whole Gachapon capsule as a child of the head occluder object.
Move it inside the container then duplicate it several times depending on how many capsules you want there to be inside the container. You can scale it up or down and rotate each one so it looks more diverse. You can also prepare Materials with 2 types of shade per color and apply it to each of the Gachapon capsules.

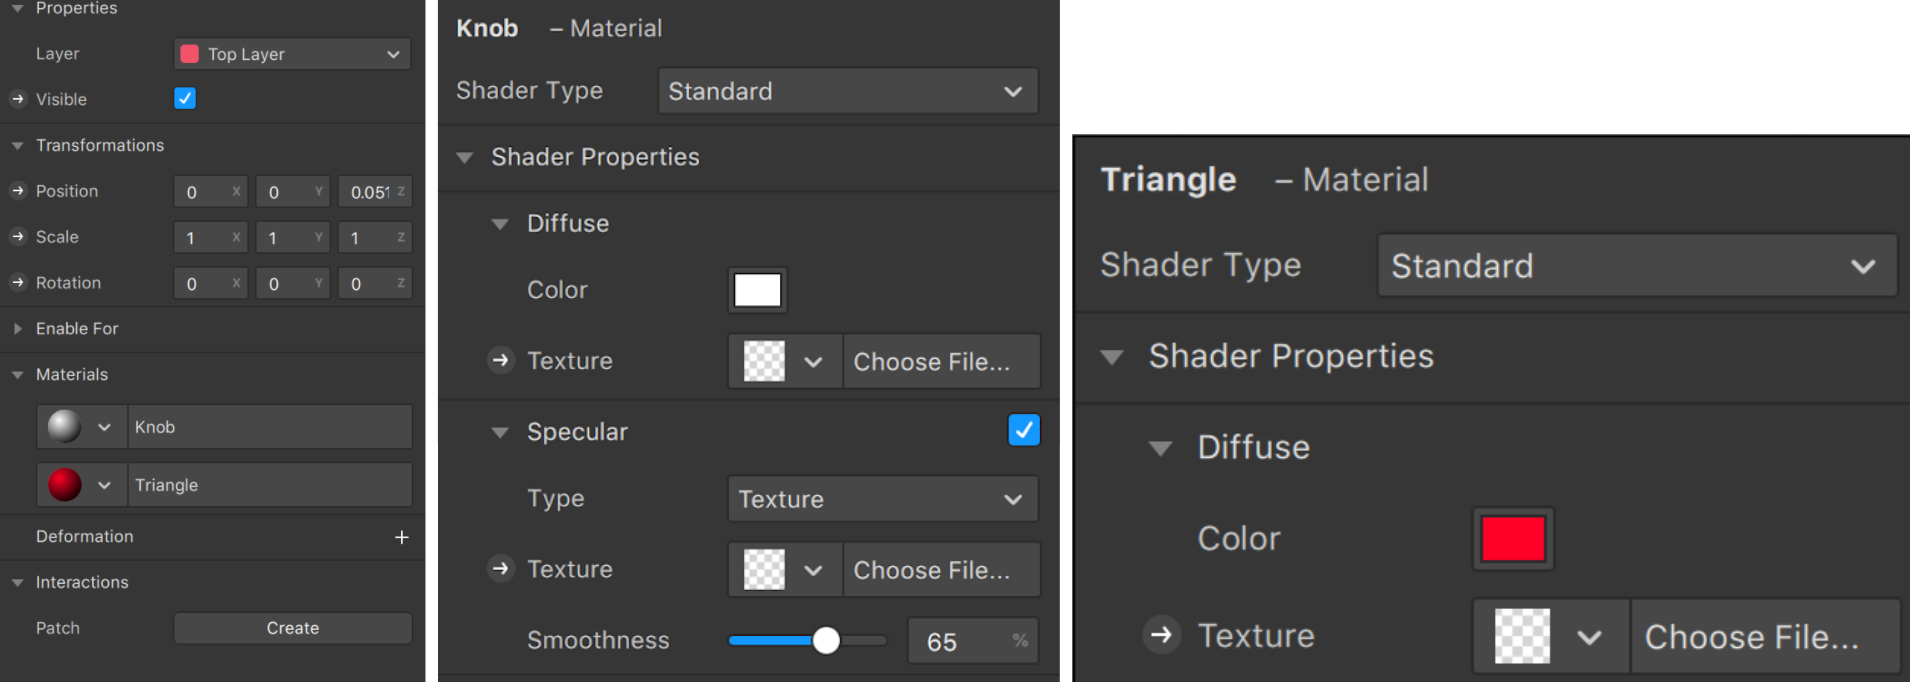
Go back to the assets panel and drag the 3D knob as a child of the Face tracker. Resize it, position it and color it depending on your preference but for now, let’s make it around the same size as the nose and position it there. Let’s make the material look like it’s white and plastic so let’s retain the shader type which is standard. Let’s also turn on specular and change the softness to 65%. Let’s also add a red color to the small triangle on the knob so that it’s more visible.
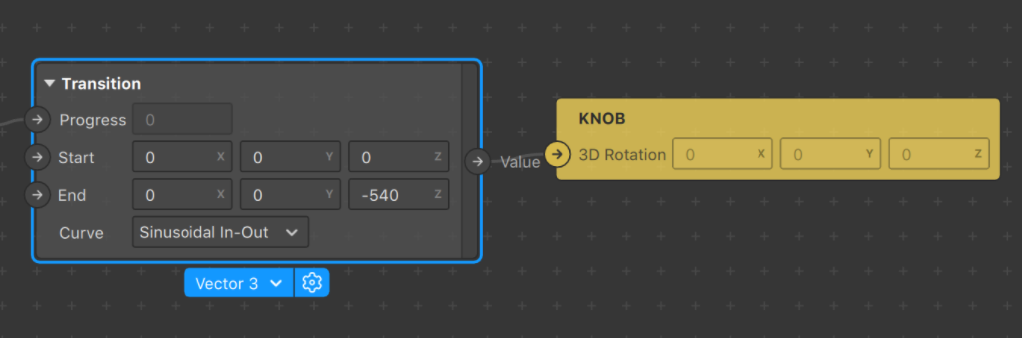
Let’s animate the Knob so that when the user opens his mouth, the knob will rotate for a couple of times first before the toy comes out.
To do that, select the face tracker in the scene panel then in the inspector panel, under interactions, click create and a drop down menu will appear. There are many interactions to choose from but for this project, let’s use Mouth Open since the toy will come out of the mouth.
Upon selecting it, the Patch Editor will open up along with the patches created for the face tracker. Let’s add the patches that we will need to animate the knob. Go to the bottom of the patch editor and click Add Patch.
Search and import the following patches:
PulseAnimation(Rename this to Animation 1 by double clicking the word.)Transition
Connect the following:
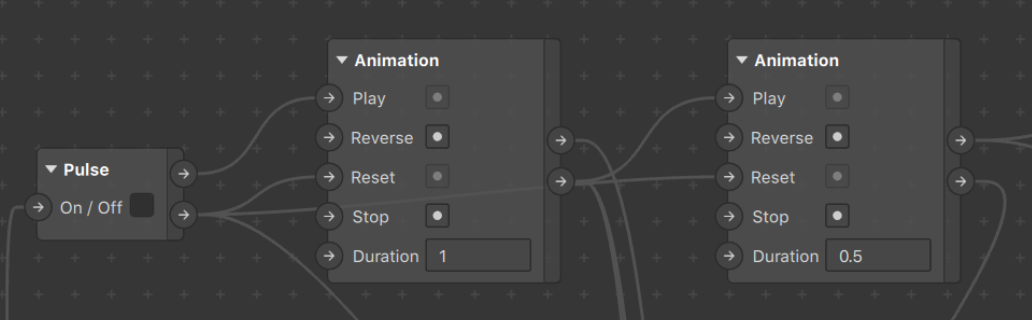
Mouth Open’s Mouth Open State output >Pulse’s On/Off inputPulse’s Turned on output >Animation’s Play inputPulse’s Turned off output >Animation’s Reset inputAnimation’s Progress Output >Transition’s Progress inputTransition’s Value Output > Knob’s 3D Rotation input

Change the values in transition. In this case, the know’s arrow is facing up so we don’t need to change that. Let’s keep the start all at 0. We just need the knob to turn counterclockwise 1 and ⅕ times so let’s put -540 in Z on the end. Let’s also change the curve from Linear to Sinusoidal in and out.
Now, let’s prepare the Gachapon capsules and toys that will come out of the mouth.
Part 3 - Gachapon Capsules
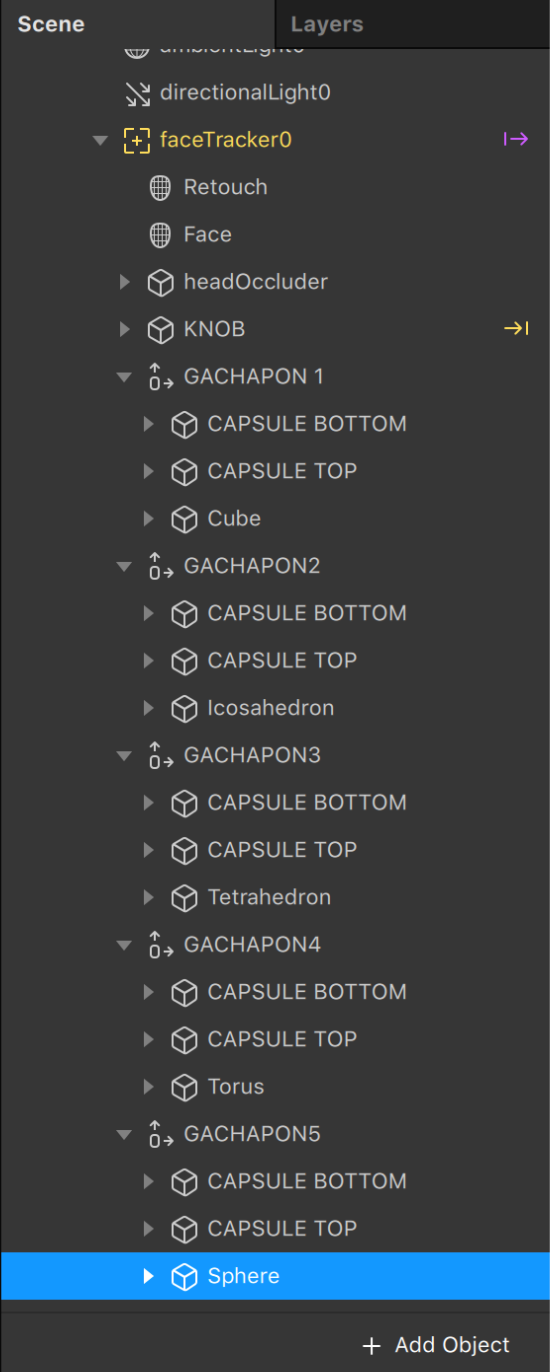
Select the Face tracker then right click and add a Null object. Rename it to “Gachapon 1” then duplicate the same number as how many toys you’ll want to put in your project. In this project we have 5 so we’ll need to duplicate it 4 times to end up with 5 Null Objects. Inside each null object, drag one Capsule Bottom 3D, one Capsule Top 3D and one toy. Your scene panel should look like this.
First let’s randomize the color of the capsule that will come out after the knob finishes turning.
Let’s add a Random patch and an Option Picker.
Change the Option Picker from Number to Color then put the same colors as what we already have inside the container.

To get the exact color, copy the HEX color number of the other materials to each of the colors in the option picker. Since we have only 4 colors, you can leave the last color black. There’s no need to change it.
Connect the following:
- Remember the Animation patch that’s connected to the knob rotation? Connect that patch’s completed output >
Random’s Randomize input so once the knob finishes rotating, it will send a pulse to start randomizing the color for the capsule. Change the End range of theRandompatch to 3 as well since we have 4 colors. Random’s Value Output > Option Picker’s Option Input- Go to the material of the top and bottom capsule and click the arrow next to texture to make a patch out of it. Check the specular as well and change the smoothness to 60%. Then connect the Option picker’s output to the input in either one of the two texture patches we created. Let’s connect it to the bottom first so it has a darker color.
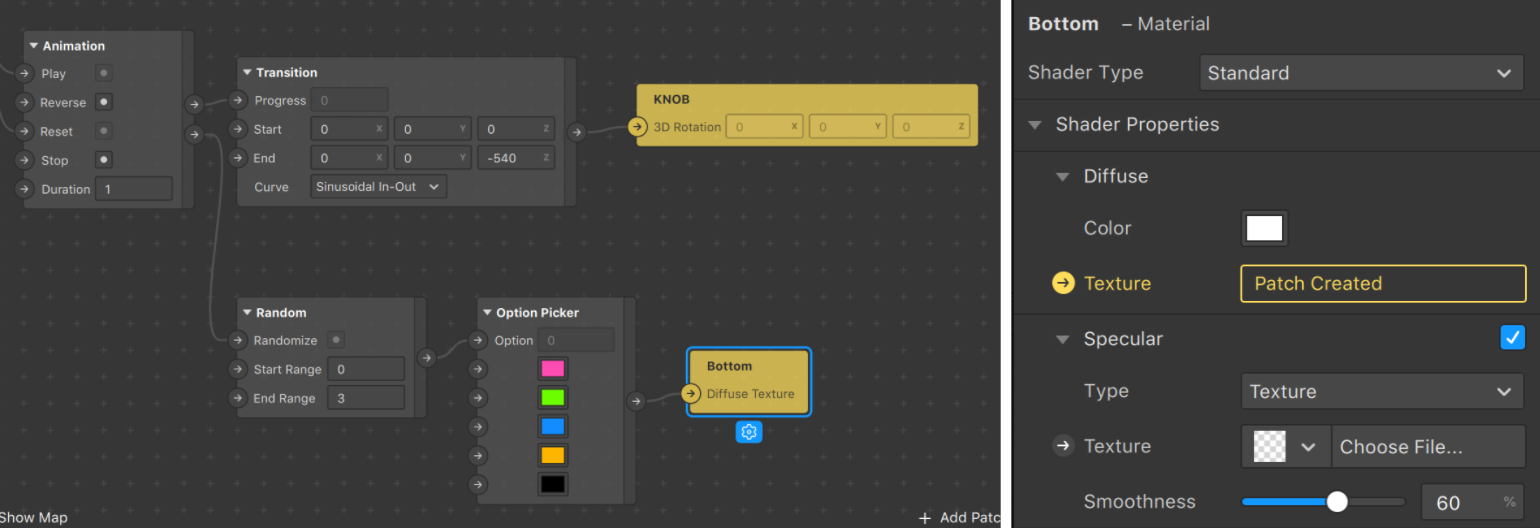
Now for the color of the top part of the capsule, let’s get an If Then Else patch, Divide and Add.
Change the type of the If Then Else patch to Color then connect the following:
Option Picker’s output >If then else’s Then input- Connect
If then else’s output >Divide’s First Value input then change the second value to 1.5 - Connect
Divide’s output >Add’s First Value Input then change the second value to 0.8 - Connect
Add’s output > Material’s Diffuse Texture Patch for the Top part of the capsule
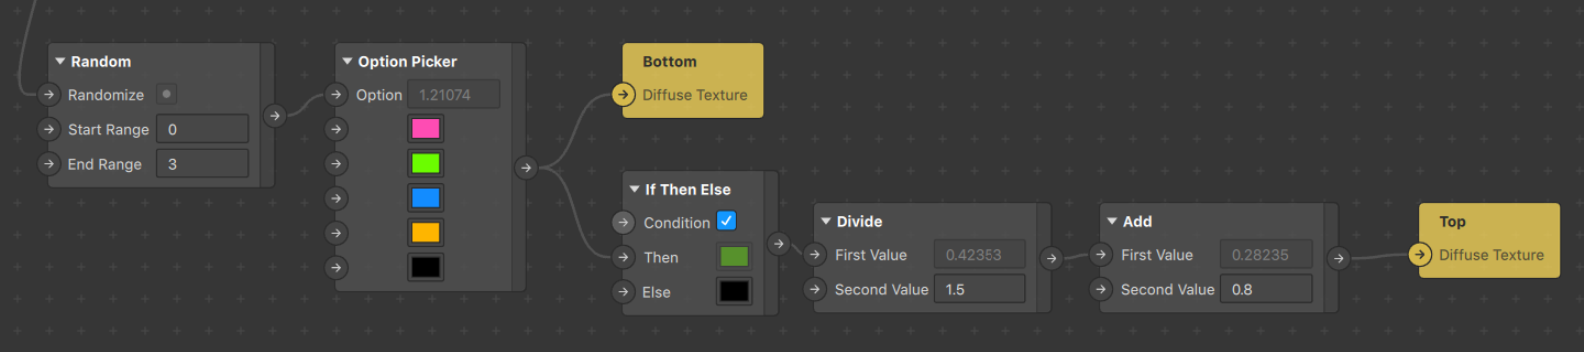
Now everytime the color randomizes, we will always have the same color for both objects just with different tones.

Now let’s randomize which capsule will appear everytime the user opens his mouth.
Let’s add another set of patches. Let’s get 1 Random patch, 5 Round patches and also 5 Equals Exactly patches.
- Again, connect the knob’s Animation patch’s completed output >
Random’s Randomize input then change the end range to 4 since we have 5 toys. - Connect
Random’s Value output > each Input of theRoundpatches - Connect
Round’s output > each input ofEquals Exactlyand on each of the second input in all of those patches, input the values 0,1,2,3 and 4 respectively. - Remember the 5 Null objects we made? Get the Visibility patch of each of those nulls by clicking the arrow beside visible then connect each
Equals Exactly’s Output to each of the Visible inputs.


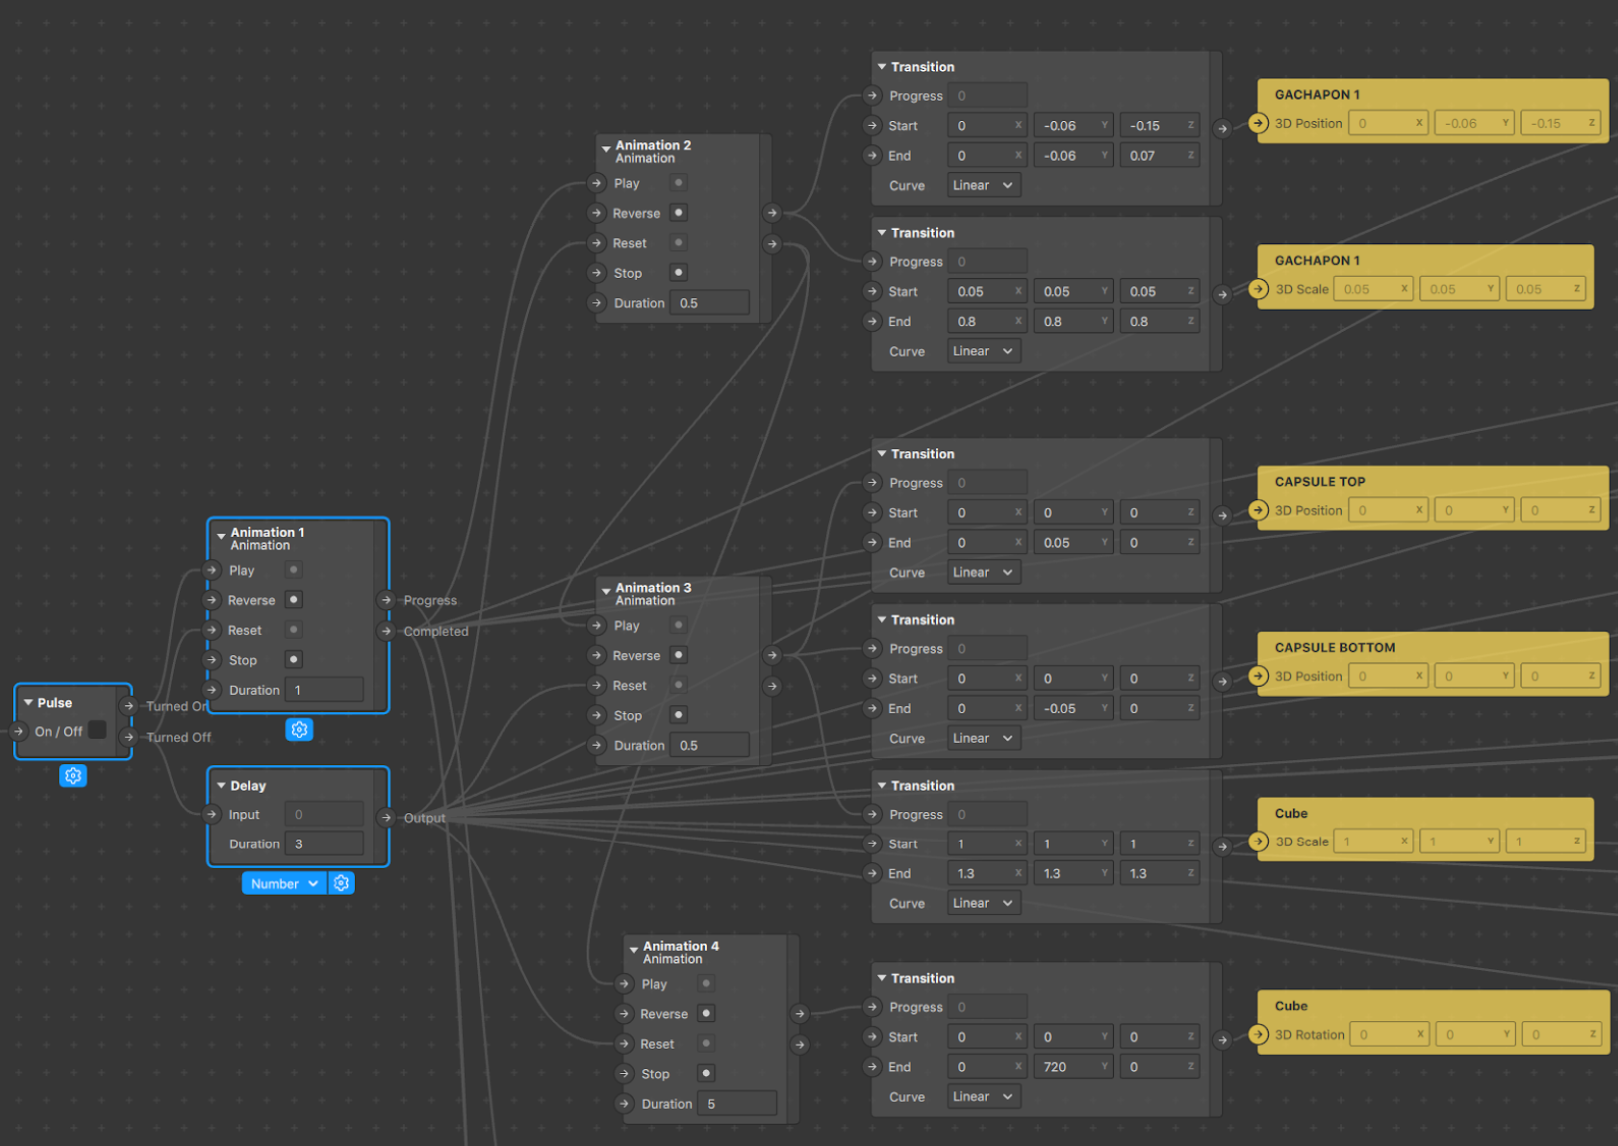
The trick here is that everytime Mouth open is triggered, Gachapons 1 to 5 will all activate but only 1 will be visible. On the next part, we’ll be animating Gachapon 1 first so it will be a little difficult to test it if the gachapons are randomized. To fix that, let’s change the End Range in the Random patch from 4 to 0 in the meantime so it will only get Gachapon 1 every time you open your mouth to view the animation you’ve done so far. Remember to change it back again later.
Now let’s go to the animation part. What we’ll want to do is animate the Gachapons to come from inside the mouth to outside while still closed then it will open up and reveal the toy inside afterwards. We should make the capsule small enough to fit the mouth and gradually scale up so we can have a better look at the toy.
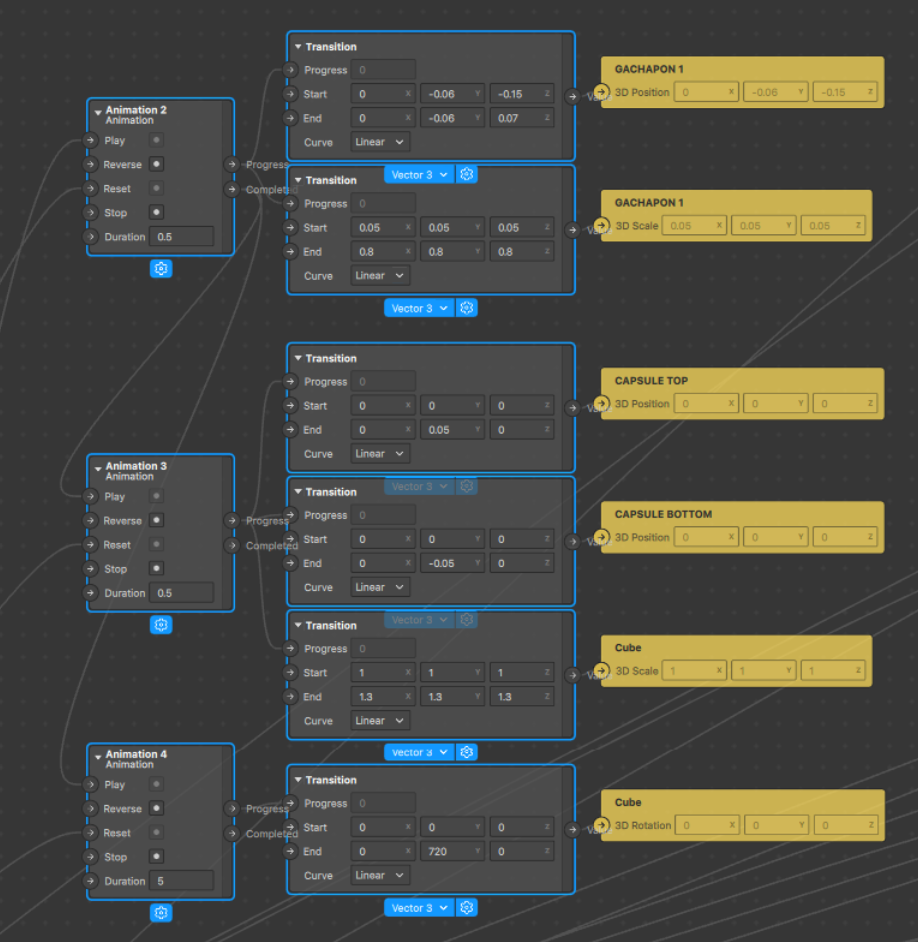
First let’s get a couple of patches. Get an animation patch and 2 transition patches because we will be animating the position and the scale of the whole capsule first. Change the Duration in the animation patch to only 0.5 so it moves faster. Remember, this is our 2nd animation patch.
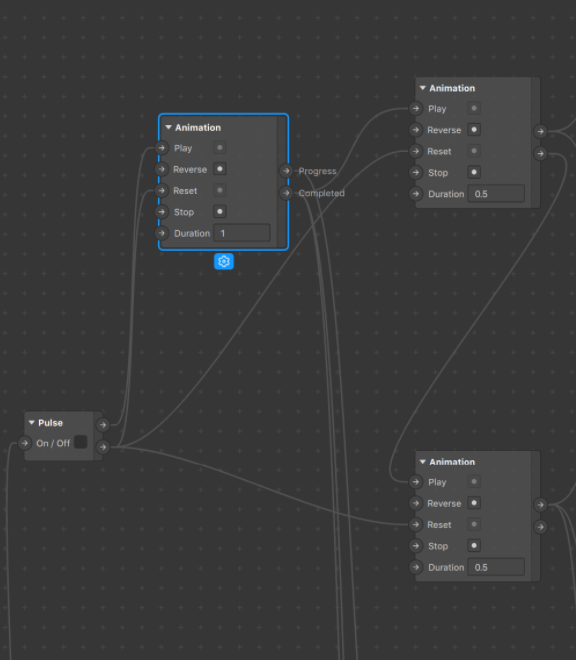
Again, remember our very first animation patch for the knob? Connect that patch’s Completed output to our new Animation’s Play input. (Rename this to Animation 2 by double clicking the word). Now this way, the capsule’s position and scale animation will only start after the knob has finished turning.
Now if you test it, it works but it doesn’t disappear afterwards. What if we want to try again?
Take a look at the very first Pulse patch we added and connected to our very first Animation patch. Now, connect that Pulse’s Turned Off output to our new animation’s reset input.
We will need to do that on all the animation patches that we will be adding next so don’t forget to do so.
Now, go to the scene panel and select your Gachapon 1 Null object then go to the inspector and click the small arrows beside Position and Scale to get the patches for these parameters.
Connect 1 transition output to the Position input and the other transition output to the scale input.
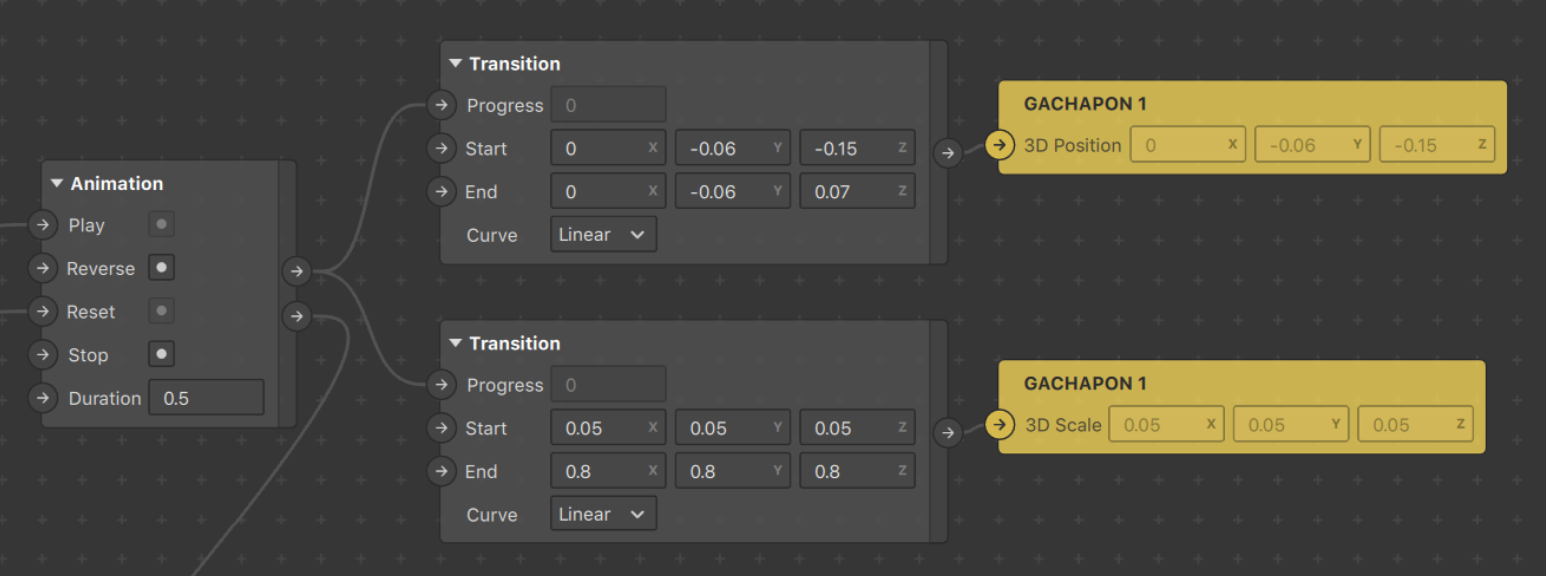
Let’s start with the Position first. We want it to go out of the mouth so that means we need to animate its Z axis. On the Z axis start, input -0.15 and on the Z axis end, input 0.07. Now it goes out of the face but the position is a little higher than the mouth. We will need to change the Y axis as well. Change both the start and end values of the Y axis to -0.06. Now that should be at the same level as the mouth.
Let’s go to the next transition patch. Let’s make the capsule start from small so let’s change the start values to something like 0.05 and the end values to 0.8.
Now that the first part of the animation is done, let’s move to the second part. What we will want to do next is animate the top and bottom capsule so it will open up and reveal the toy inside.
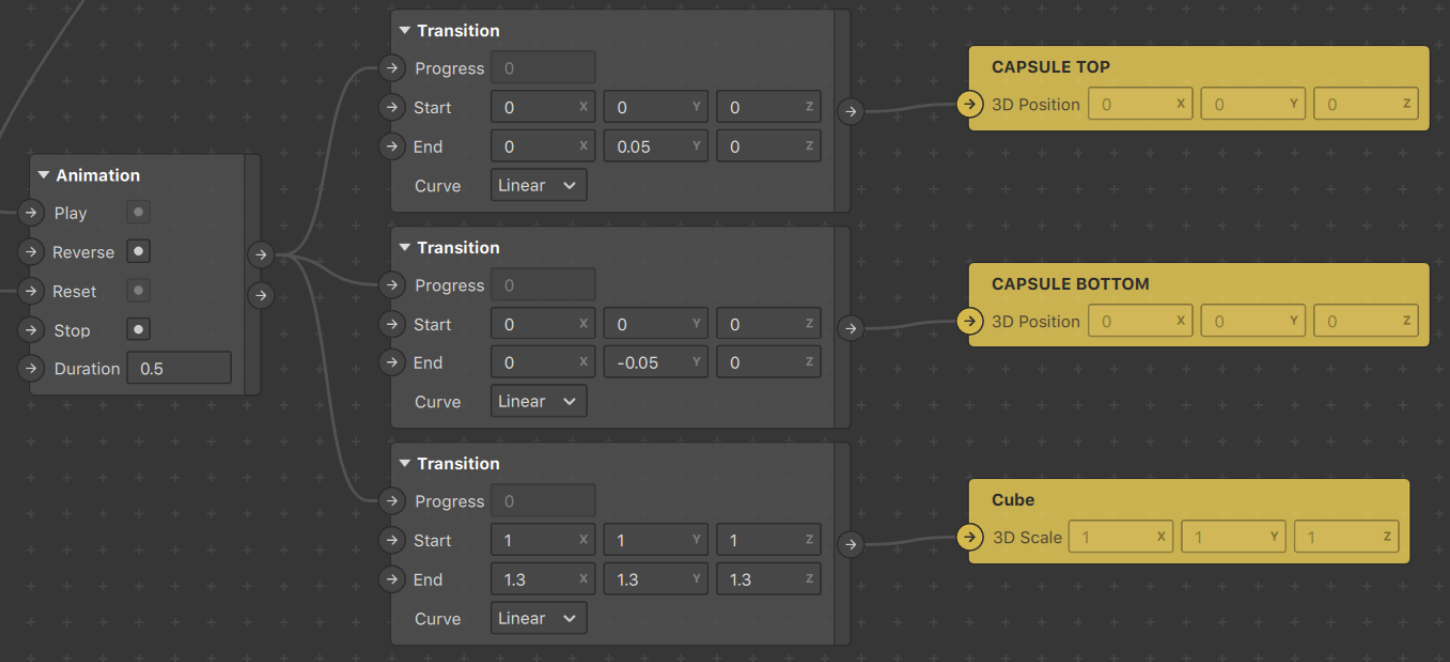
To do that, let’s get another Animation Patch and 3 Transition patches. Remember, this is our 3rd animation patch. The 1st transition will be for the top part of the capsule, the 2nd transition will be for the bottom part of the capsule and the 3rd transition patch will be for the scale of the toy. Connect the 3rd animation patch’s progress output to each progress input of the transition patches.
Now, connect the 2nd Animation patch’s completed output to the 3rd Animation patch’s Play input (Rename this to Animation 3 by double clicking the word). This way, our new animation, which is the top and bottom part of the capsule opening up to reveal the toy, only plays when the whole capsule comes out of the mouth. Also, remember our first Pulse Patch? Connect that patch’s turned off output to the 3rd animation patch’s reset input so this animation will also reset once the user closes his mouth. Don’t forget to change the 3rd animation’s duration also to 0.5, same as the duration of the 2nd animation so that we can make the animation faster.
Now, we’ll want to animate the top part of the capsule to go upwards and the bottom part of the capsule to go downwards. First, let’s get the position patches of these two by selecting them on the scene panel and clicking the small arrow beside the word Position in the inspector panel. Once we have the position patches, connect the output of the transition patch to the Capsule Top’s position patch and the other transition to the Capsule Bottom’s position patch. Change only the end values of the Y axis for both. For the Top part, we’ll want it to go up so put 0.05 in the end value of Y axis and for the bottom part, change the end value of the Y axis to -0.05. You can change these values depending on how high or low you want the capsules to be. Next up, we will animate the toy to make it bigger once the capsules have opened up. To do that, let’s first get the scale patch of the toy by selecting your toy or in this case, the cube, in the scene panel and again click the small arrow beside the word Scale in the inspector panel. Once the scale patch is created, connect the output of the 3rd transition patch to it. Change the start and end value according to the size of your toy but again in this case, we can put 1 as the start value in the X, Y, and Z axis and change the end values to 1.3.
Bonus! Now what if we want the toy to rotate because we’re feeling fancy! What we need to do is just duplicate our 3rd Animation patch and connect it to a new Transition patch. (Rename this to Animation 4 by double clicking the word.) Don’t disconnect the connections because we want the exact same thing for this new animation. Why do we have to duplicate it? Why can’t we just connect the new transition to the 3rd animation patch? It’s because we need to change the Duration. On the fourth animation patch, change the duration to a longer one, maybe around 5 or more. Then select the same toy again in the scene panel and get the rotation patch by clicking the small arrow beside it. Now, connect the output of the new transition patch to the rotation patch of the toy. Depending on how you want the toy to rotate, change the end values of the X, Y and Z axis. This time, we’ll only want it to rotate in the Y axis. So let’s start with all the start values all in 0. Change the end value of X to 0, Y to 720 and Z to 0.

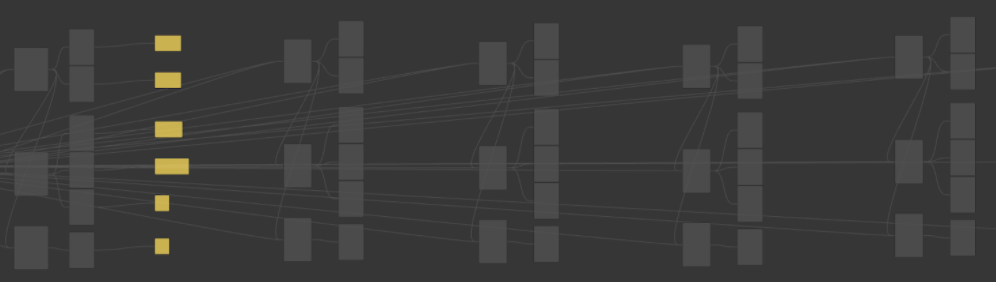
Now, we’ve completed the animation but this only works for the first Gachapon capsule. What about the others? We can just duplicate Animations 2, 3 and 4 and all the transitions connected to it and repeat the same process for the other Gachapons. The selected patches are what you’ll want to duplicate as the same number of the gachapon nulls you have.
In this project, we have 5 Gachapon nulls and toys so just duplicate it 4 times. Your project should now look something like this when you zoom out. Again don’t disconnect the connection that it already has. We will be needing all of those.
Now it’s time to get the patches for the other parameters of the remaining Gachapons. Check the Gachapon1 and take note of what Parameters are in yellow. We will get the same ones for Gachapons 2 to 5.
You’ll need to bring in each Gachapon’s null object’s Position and Scale, its Capsule Bottom and Top Position as well as the contained 3D object’s Scale and Rotation. These will connect as shown below :

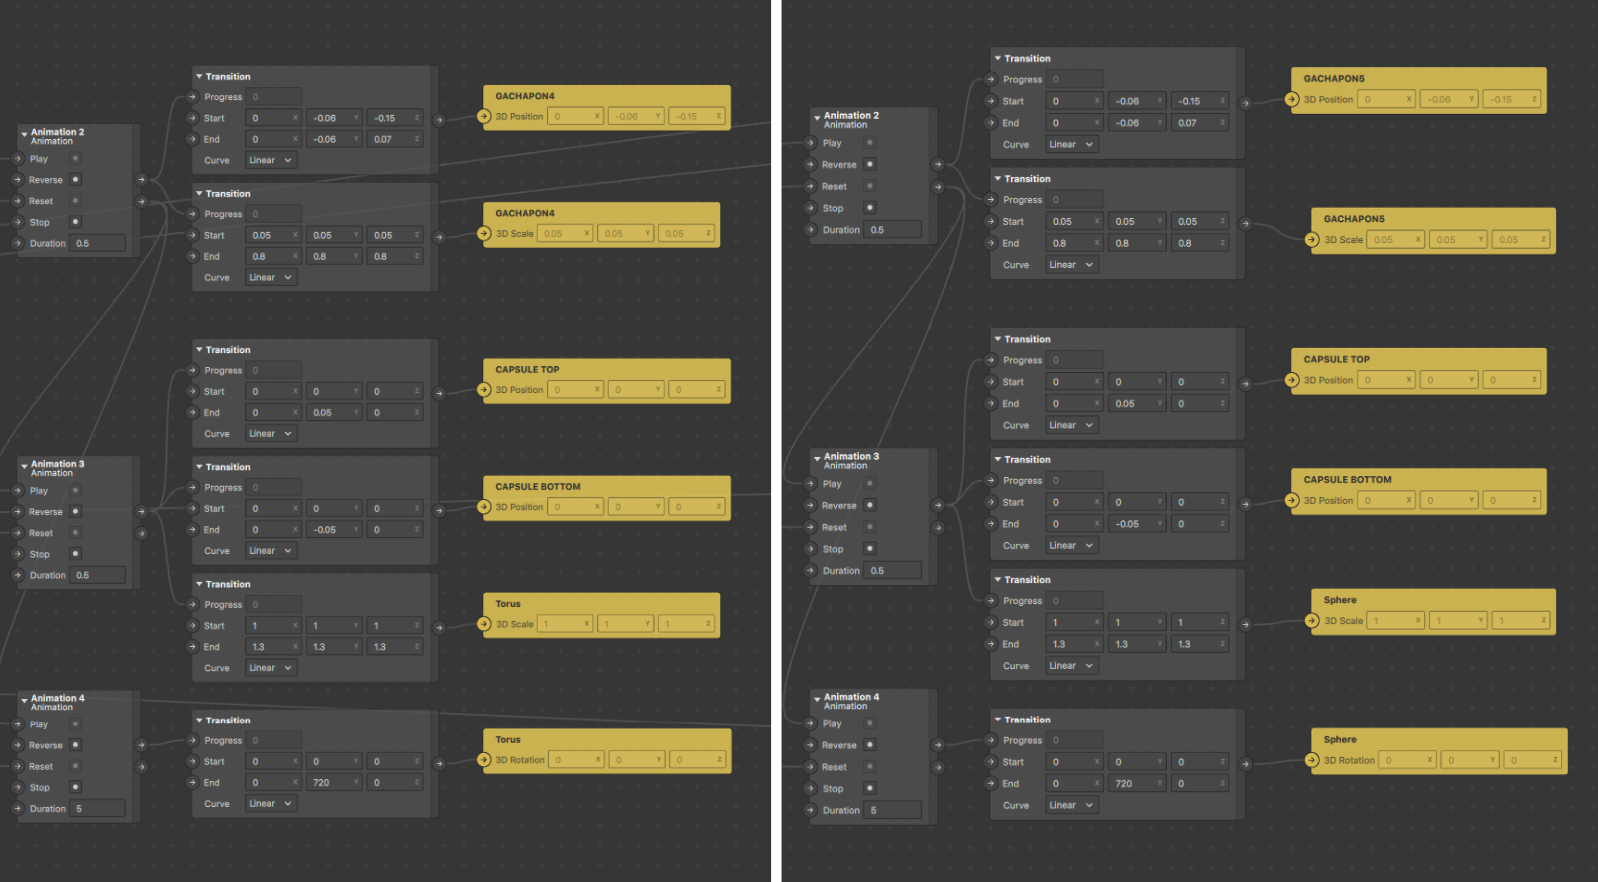
After you’ve connected all the patches, don’t forget to go back to the Random patch where we changed the End range. Change it back to 4 or to the number of Gachapon Null Objects you have. Otherwise, it would always show the same toy and never randomize. Remember, if you have 10 toys, your end range should be 9 since the start range starts at 0.
Check the effect and it should work.
Bonus! This part is not mandatory but if you want to improve your effect a little bit, try this method! You might notice that users tend to close their mouth afterwards so that will also make the toy disappear. To keep it visible, we can add a Delay Patch in between the Pulse’s Turned Off output and all the Animations’ Reset input. You can put a number like 3 seconds so when the user closes his mouth, the Gachapon toy will only disappear 3 seconds after. Just remember to connect it not just to the first batch of animation patches but to the rest of the Gachapon animations as well.
Part 4 - Finishing touches
The last thing we have to do is add an instruction so that the user will know that he needs to open his mouth to trigger the effect.
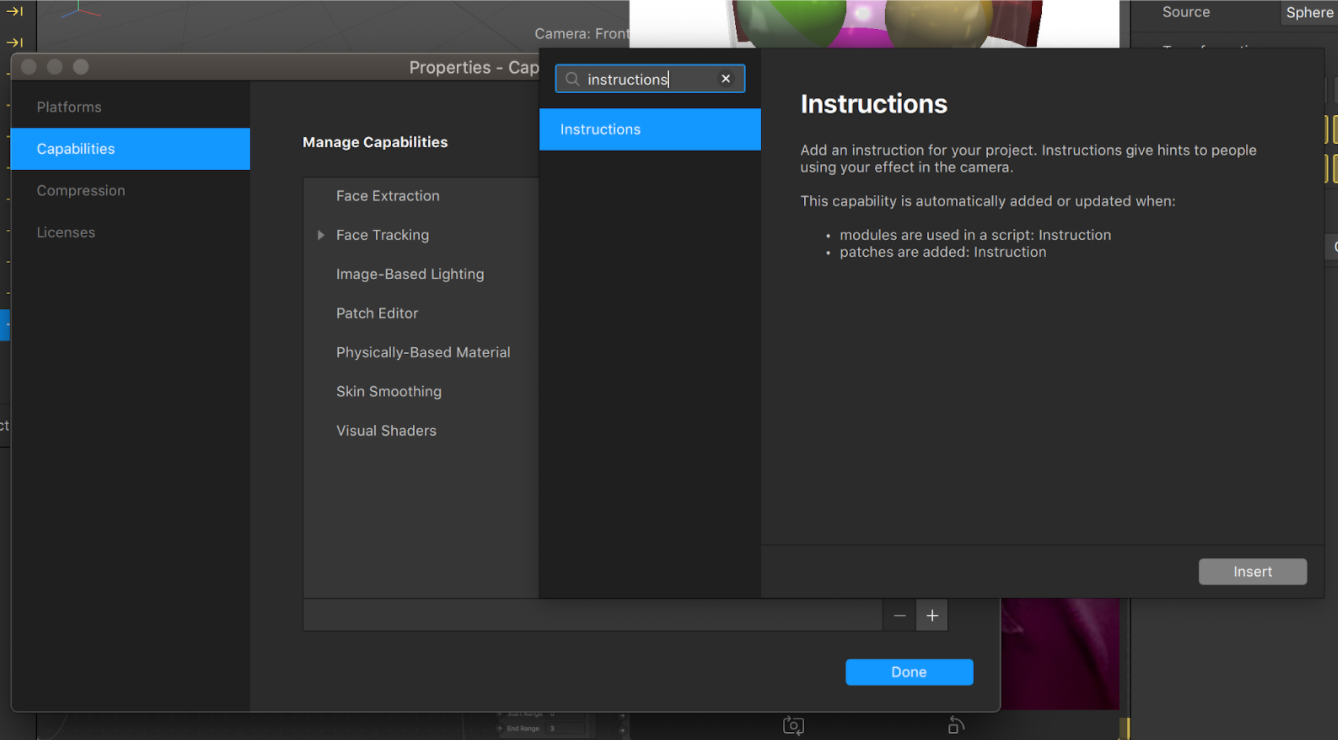
On the menu bar, go to Project then select Edit Properties. A new window will pop up. Select Capabilities and click the + sign at the bottom right part of the window. Search for “Instructions” and select it. Now, Instructions should also be listed in the Capabilities. Click the rectangle beside it and check “Custom Instructions”. Click the triangle beside it and click the + sign again. Search for “Open Your Mouth” then click insert. Click done to go back.

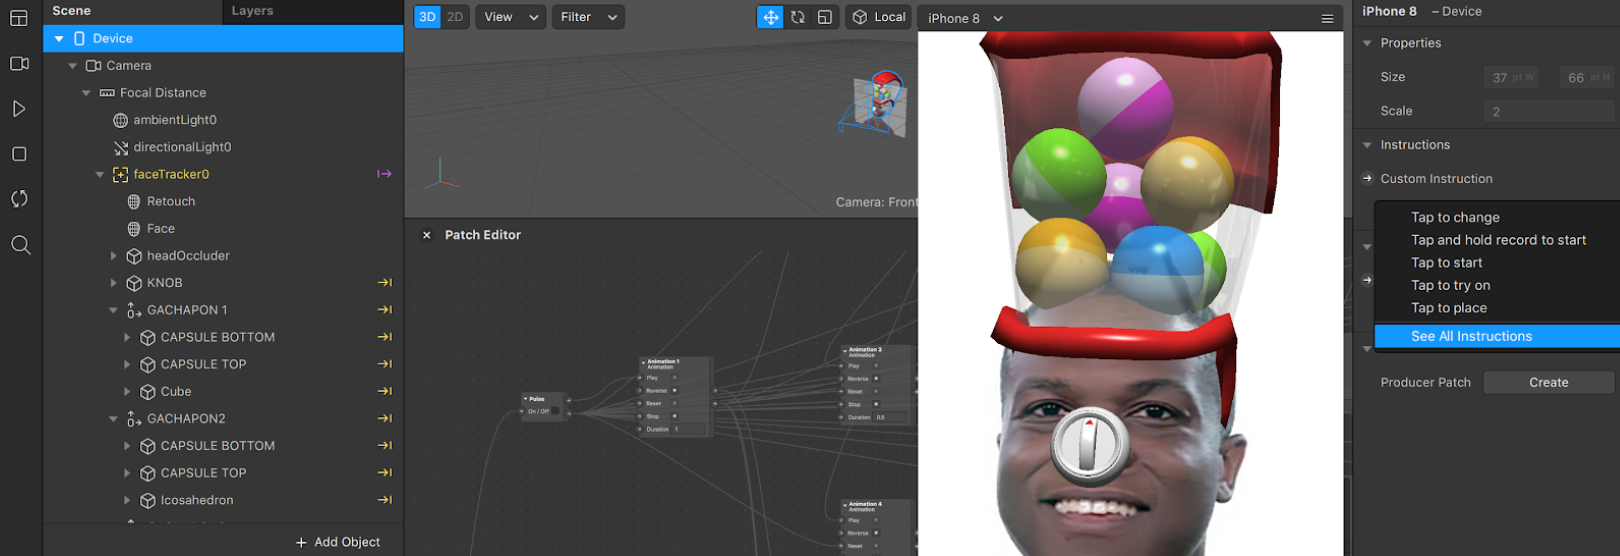
We will need to make a patch for the instructions to make it appear on the device. Go to the scene panel, and at the very top, select “Device”. Go to the inspector panel and click the drop down menu that says “Choose an Instruction” beside the phrase “On Opening”. Select “See all instructions” if you don’t see the “Open your Mouth” instruction. Another window will appear and then search “Open your mouth” again. Select it and now, Spark AR will automatically make the instruction patch for you.
The patch created should look like this:
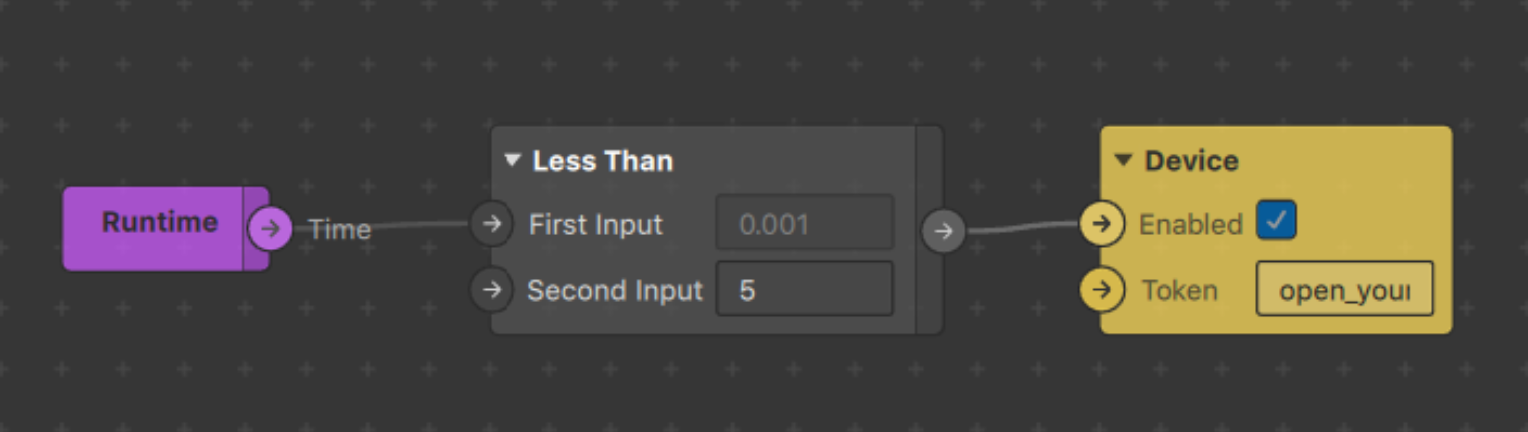
Now, when the user opens your effect, the instruction will show up for 5 seconds before it disappears. To prolong it, just change the number inside the second input in the Less Than patch.
Complete!
Woohoo! Now you have a Gachapon effect! You can take this same approach to make other randomizer effects. It could be a lottery ball head, or a Pokemon vending machine, or some kind of dice game… The world is your oyster!